Oil painting has been a timeless art form, admired for its richness, texture, and ability to capture light like no other medium. Among the most beautiful and versatile methods in oil painting is the glazing technique — a process that has been used by masters like Rembrandt, Vermeer, and Titian to create breathtaking depth and luminosity. Whether you’re a beginner or an experienced artist, understanding the oil paint glaze technique can elevate your artwork to a whole new level.
What Is the Oil Paint Glaze Technique?
The glazing technique in oil painting involves applying thin, transparent layers of oil paint over a dry, opaque layer. Each glaze slightly alters the color beneath it, creating a luminous effect that can’t be achieved through direct painting alone.
Think of it like looking through layers of stained glass — each layer changes the light that passes through it, giving the final result an incredible sense of depth and glow.
Glazing allows artists to create subtle transitions, realistic shadows, and complex color tones without overmixing paint directly on the palette.
How Does Glazing Work?
At its core, glazing works through optical color mixing. When light hits a glazed area of paint, it travels through the transparent layer, reflects off the layers beneath, and bounces back to your eye. This interaction gives the surface a radiant and dimensional appearance.
Unlike opaque painting — where color is built by mixing pigments — glazing builds color optically, allowing the eye to blend layers visually rather than physically.
Materials You’ll Need for Oil Glazing
To practice oil glazing effectively, you’ll need a few essential materials:
- Oil Paints: Use high-quality, transparent or semi-transparent pigments. (Examples: Alizarin Crimson, Ultramarine Blue, Burnt Sienna, Viridian, Transparent Oxide Red).
- Medium: A glazing medium helps thin the paint and control drying time. Popular options include linseed oil, stand oil, or ready-made glazing mediums.
- Brushes: Soft, clean brushes — typically synthetic or sable — work best for smooth application.
- Surface: Primed canvas, wood panel, or linen with a smooth surface.
- Palette & Solvent: Odorless mineral spirits or turpentine for cleaning brushes and adjusting paint flow.
Step-by-Step: How to Use the Oil Paint Glaze Technique
Here’s how you can master the glazing process:
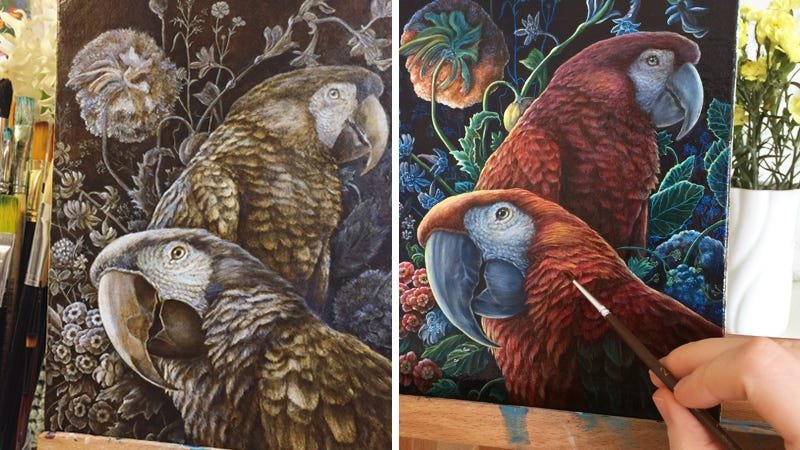
1. Create an Underpainting
Start with an underpainting (also called grisaille or monochrome base). This establishes the composition, light, and shadows in grayscale or simple color tones. Let it dry completely before glazing.
2. Choose Your Glazing Colors
Select transparent pigments that will enhance the layers beneath. Remember — glazes modify existing colors, so plan accordingly.
3. Mix Your Glaze
On your palette, mix a small amount of paint with a glazing medium (around 1 part paint to 4–5 parts medium). The result should be thin, fluid, and transparent.
4. Apply Thin Layers
Using a soft brush, apply the glaze evenly over the dried paint surface. Avoid using too much paint; glazing is about subtlety. You can wipe off or blend edges gently with a clean, dry brush or cloth.
5. Let Each Layer Dry
Allow each glaze to dry completely before adding another layer. Depending on the medium and environment, this can take a few days to a week.
6. Build Depth Gradually
Continue layering glazes until you achieve the desired effect — richer shadows, glowing skin tones, or luminous backgrounds.
Benefits of the Oil Paint Glaze Technique
- Incredible Depth: Multiple transparent layers create a 3D illusion of depth and realism.
- Radiant Color: Glazing enhances the vibrancy of colors through optical blending.
- Soft Transitions: Ideal for skin tones, skies, and light effects.
- Control and Precision: Artists can make subtle adjustments without repainting entire areas.
- Timeless Finish: The sheen and richness of glazed paintings give them a museum-quality appeal.
Common Mistakes to Avoid
- Using Opaque Paints: Only transparent pigments work well for glazing.
- Too Much Medium: Over-thinning can make the glaze sticky or cause cracking.
- Impatience: Applying new layers before the previous ones are fully dry can ruin the surface.
- Skipping the “Fat Over Lean” Rule: Each new glaze should contain slightly more oil than the one beneath to prevent cracking over time.
Tips for Perfecting Your Glazes
- Keep layers thin — less is more.
- Test glazes on a scrap surface first.
- Mix colors cleanly; muddy tones come from overmixing.
- Use natural light to evaluate transparency.
- Try glazing over warm underpaintings for glowing effects.
Famous Artists Who Used the Glazing Technique
- Rembrandt – Created luminous skin tones and glowing light with complex glazes.
- Vermeer – Achieved delicate light transitions and smooth textures.
- Da Vinci – Used glazing to add softness and subtle depth in the Mona Lisa.
- Titian – Mastered deep reds and warm highlights through layered transparent color.
Their mastery of glazing remains a cornerstone of classical oil painting techniques even today.
Conclusion
The oil paint glaze technique is a timeless method that brings art to life with light, transparency, and depth. It bridges science and creativity, allowing painters to play with color and luminosity in ways that direct painting simply can’t replicate.
Whether you’re working on portraits, landscapes, or abstract art, mastering glazing will give your work a professional, glowing quality that stands the test of time.
So, take your time, experiment with layers, and discover the magic that glazing can bring to your paintings.
FAQs About Oil Paint Glaze Technique
1. What is the purpose of glazing in oil painting?
Glazing adds depth, vibrancy, and realism by layering transparent paint over dry surfaces, letting light pass through the layers for a luminous effect.
2. Which oil paints are best for glazing?
Transparent pigments like Alizarin Crimson, Ultramarine Blue, Viridian, and Burnt Sienna work best.
3. How long should I wait between glaze layers?
Typically, allow 2–7 days for each layer to dry, depending on the medium and paint thickness.
4. Can beginners try oil glazing?
Yes, absolutely. Beginners can start with simple layers over grayscale underpaintings to learn control and blending.
5. Is glazing possible with acrylics?
Yes, though the result differs slightly. Acrylic glazing mediums dry faster and lack the same luminous oil depth, but the method is similar.