Mehndi, also known as henna, is an ancient art form that has been celebrated for centuries across South Asia, the Middle East, and parts of Africa. Often applied during weddings, festivals, and special occasions, mehndi designs symbolize beauty, celebration, and cultural heritage. The intricate patterns and designs of mehndi not only highlight artistic talent but also reflect traditions passed down through generations.
For beginners and enthusiasts alike, understanding what is used to make mehndi designs is essential. This includes knowing the ingredients, tools, and techniques that go into creating stunning and long-lasting henna art.
What Is Mehndi?
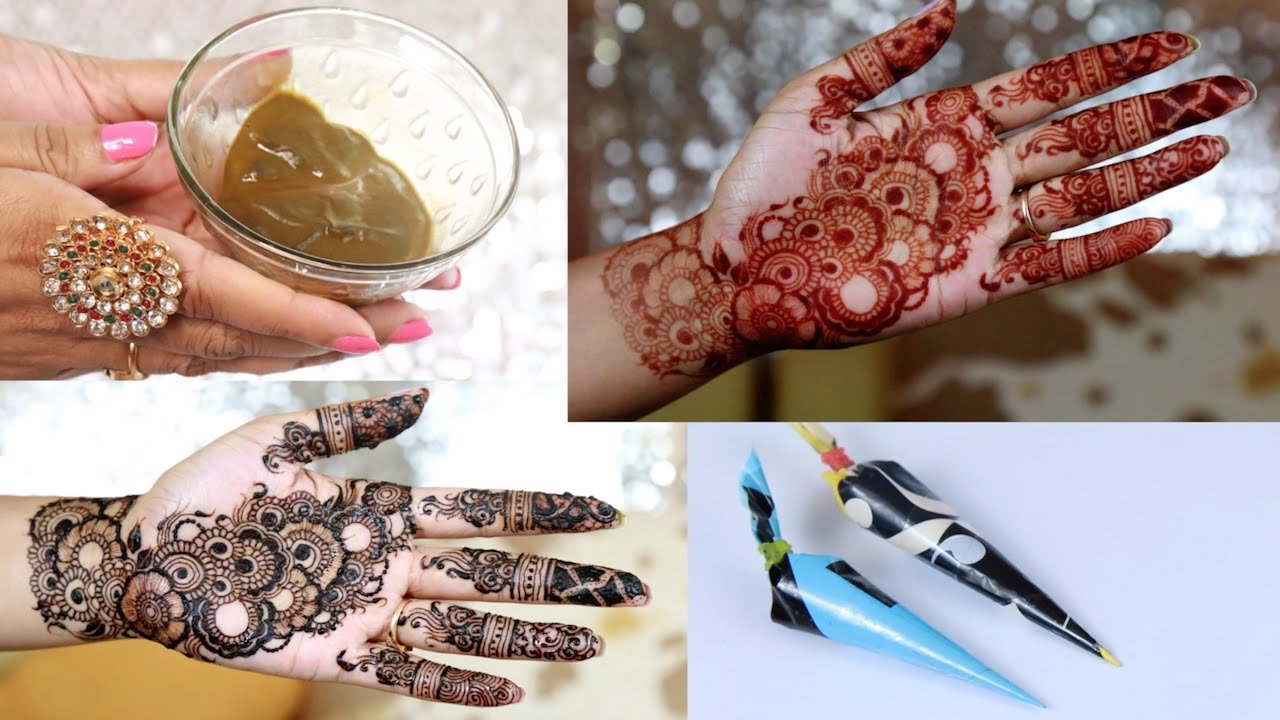
Mehndi is a paste made from the powdered leaves of the henna plant (Lawsonia inermis). When applied to the skin, the dye stains the skin in shades of orange, red, or brown, depending on the quality of the henna and the time it is left to develop. What is used to make mehndi designs is a cone filled with henna paste, which is applied to create intricate patterns on the skin.
Traditionally, mehndi is used for:
- Weddings: Bridal mehndi is a significant part of ceremonies in many cultures.
- Festivals: Celebrations like Eid, Diwali, and Karva Chauth feature mehndi applications.
- Body Art: Mehndi is also used for decorative purposes, expressing creativity and style.
Understanding the components that make up mehndi designs allows artists to create vibrant, intricate, and safe artwork.
Ingredients Used to Make Mehndi Designs
High-quality mehndi requires more than just powdered henna leaves. Common ingredients include:
1. Henna Powder
- Source: Made by drying and grinding henna leaves.
- Quality Indicators: Fresh, fine, and green henna powder yields a richer, darker stain.
- Purpose: The primary dye that stains the skin.
2. Essential Oils
- Types: Eucalyptus, tea tree, lavender, or clove oil.
- Purpose: Essential oils help release the dye in henna, intensifying the stain and providing a pleasant fragrance.
- Usage Tip: A few drops mixed into the paste improve color quality and consistency.
3. Natural Liquids
- Common Choices: Lemon juice, water, or tea.
- Purpose: Liquid binds the henna powder into a smooth paste suitable for application.
- Pro Tip: Lemon juice enhances color release due to its acidity.
4. Sugar
- Purpose: Sugar helps the henna paste stick to the skin longer, preventing cracking and flaking.
- Application: Typically, a small amount is added to the paste for a smoother, longer-lasting application.
5. Optional Additives
- Honey, coffee, or herbal extracts may be added to enhance the color, scent, or consistency.
Using natural ingredients ensures the paste is safe for skin, avoiding chemical reactions or allergies.
Tools Used to Make Mehndi Designs
While the ingredients are essential, the tools used determine the precision and intricacy of the designs. Common tools include:
1. Mehndi Cones
- Description: Small cone-shaped tubes filled with henna paste, similar to piping bags used in cake decorating.
- Usage: Allows artists to draw fine lines and intricate patterns with precision.
- Tip: Make small cuts at the tip for controlled flow of henna.
2. Applicator Bottles
- Description: Small bottles with fine tips for detailed application.
- Advantage: Easier to handle for beginners compared to cones.
3. Toothpicks or Sticks
- Purpose: Used for minor corrections or for creating very delicate details.
4. Stencils
- Purpose: Helpful for beginners to achieve consistent patterns.
- Note: Traditional mehndi is often freehand, but stencils can save time.
5. Cotton Swabs or Cloth
- Purpose: For cleaning mistakes and dabbing excess paste.
Techniques for Creating Mehndi Designs
Creating beautiful mehndi designs requires skill and practice. Various techniques are used by artists to achieve different effects:
1. Freehand Drawing
- Most traditional mehndi designs are drawn freehand.
- Requires a steady hand and practice.
- Patterns include floral motifs, paisleys, geometric shapes, and intricate lace designs.
2. Layering
- Multiple layers of henna can create depth and darker stains.
- Artists may apply a thin base layer first, allow it to dry partially, and then add intricate details on top.
3. Shading and Filling
- Some designs incorporate shading by applying varying pressure with the cone.
- Filling techniques include dots, lines, or cross-hatching to add texture.
4. Mixing Patterns
- Combining geometric, floral, and tribal patterns creates unique and personalized designs.
- Commonly used in bridal mehndi to cover large areas elegantly.
5. Aftercare Techniques
- Drying: Allow the paste to dry for 4–6 hours for a deep stain.
- Lemon-Sugar Sealant: Dab a mixture of lemon juice and sugar to keep the henna moist and improve color.
- Heat Application: Gently warming the area enhances the stain.
- Peeling Off: Scrape the dried paste off instead of washing with water immediately.
Popular Mehndi Design Styles
Understanding different styles helps determine which tools and techniques to use:
- Indian Style
- Dense and intricate, often covering hands and feet entirely.
- Includes paisleys, florals, and detailed motifs.
- Arabic Style
- Bold, flowing patterns with empty spaces.
- Easier for beginners due to less density.
- Pakistani Style
- A combination of Indian and Arabic styles.
- Features intricate detailing with moderate spacing.
- Moroccan / Geometric Style
- Focuses on symmetrical patterns and geometric shapes.
- Modern / Fusion Styles
- Minimalist designs, fusion with tattoos, or temporary decorative patterns.
Safety and Skin Considerations
Using high-quality, natural ingredients is essential to avoid skin irritation:
- Conduct a patch test before full application.
- Avoid chemical-laden “black henna,” which can cause severe reactions.
- Ensure the skin is clean and free of oils before applying henna.
- Keep the area moisturized after removing the paste to prolong the stain.
Tips for Beginners
- Start with simple patterns and gradually practice more complex designs.
- Practice on paper or practice sheets before applying to the skin.
- Keep the henna cone at the right temperature; slightly warmed paste flows better.
- Use reference images to improve design accuracy and creativity.
Conclusion
Creating mehndi designs is an art form that combines tradition, creativity, and patience. Knowing what is used to make mehndi designs—from high-quality henna powder and essential oils to cones and applicators—is crucial for achieving beautiful results.
By mastering the tools, ingredients, and techniques, anyone can create intricate, long-lasting designs that reflect personal style, cultural heritage, and artistic expression. Whether you are a beginner exploring this art or an experienced artist refining your skills, understanding these elements ensures each mehndi design is vibrant, precise, and truly stunning.
FAQ
Q: What is the main ingredient in mehndi?
A: Powdered leaves of the henna plant (Lawsonia inermis).
Q: Can I make mehndi at home?
A: Yes, with henna powder, essential oils, and natural liquids like lemon juice or water.
Q: What tools are needed for mehndi designs?
A: Mehndi cones, applicator bottles, sticks, stencils, and cotton swabs.
Q: How long does mehndi take to stain the skin?
A: Usually 4–6 hours for a deep, lasting stain.
Q: Are there any safety precautions for mehndi?
A: Avoid chemical-laden black henna, do a patch test, and use natural ingredients for skin safety.